□ 디버깅 준비
1. 라즈베리파이4 _ 원격 프로그램 업로드 등 관리
2. 제작한 컨트롤러
3. LTE 라우터
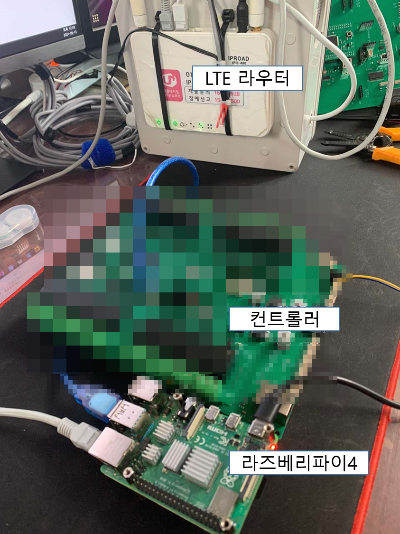
- 네트워크는 고정IP를 사용하는 LTE 라우터를 이용한다.
- 라즈베리파이는 고정 IP를 사용하며 LTE 라우터에서 포트포워딩을 해준다.
□ 라즈베리파이 환경 설정
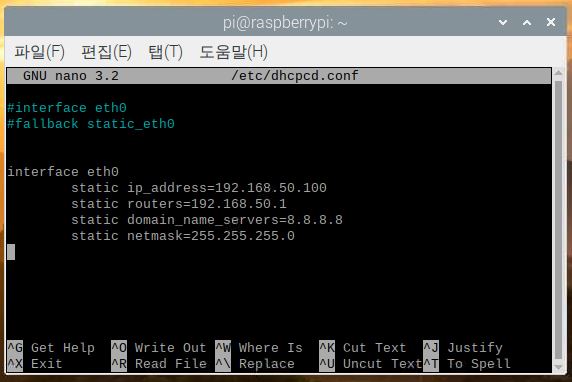
1. 라즈베리파이 고정 IP 설정
2. 라즈베리파이 IDE 설치
interface eth0
static ip_address=192.168.50.100
static routers=192.168.50.1
static domain_name_servers=8.8.8.8
static netmask=255.255.255.0
[/etc/dhcpcd.conf] 파일에 다음의 내용을 추가하고 아래와 같이 아이피를 확인한다.

□ LTE 라우터 포트포워딩 및 VNC 접속 그리고 아두이노 IDE 설치
아래 글에서 정리한 내용대로 LTE 라우터를 포트포워딩 하고 VNC 원격 접속을 한다.
라즈베리파이4 한글 설정과 원격 SSH, VNC 를 위한 설정
1. 라즈베리파이4 한글 설정 2. 라즈베리파이4 SSH, VNC 설정 3. 고정 IP 사용하는 LTE 라우터 SSH, VNC 포트 포워딩 □ 라즈베리파이4 한글 설정 라즈베리파이4 OS 구워서 올리고 초기 설정과정에서 지역
abc0123.tistory.com
그리고 아두이노 IDE를 이용해서 코드를 올리기 위해 다음 글과 같이 개발 도구를 설치 한다.
라즈베리파이4 아두이노 IDE 설치
라즈베리4에 아두이노 IDE가 설치되어 있지 않다. 그래서 이 녀석을 설치하면서 그 과정을 간단하게 정리해놓는다. 우선 https://www.arduino.cc/ 에서 SOFTWARE로 이동해서 [Linux ARM 32 bits] 버전을 다운 받.
abc0123.tistory.com
ㅁ 컨트롤러 디버깅
1. 시리얼 통신 디버깅
- 코드
void setup() {

  Serial.begin(115200);
  Serial.println("Debugging_Start");
}

void loop() {
  Serial.println("TEST1");
  delay(1000);
  Serial.println("TEST2");
  delay(1000);
}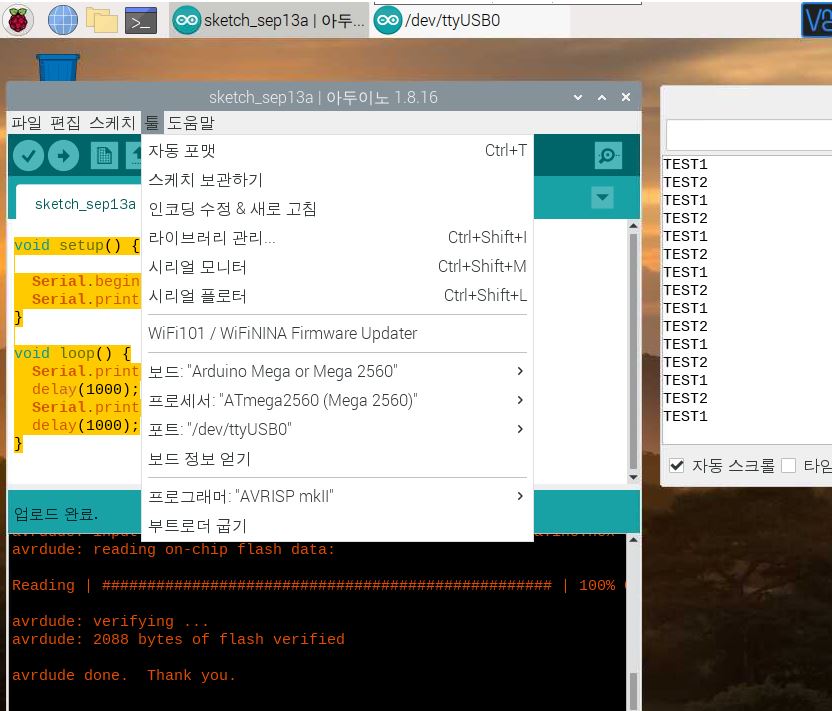
- 보드 : Arduino Mega or Mega 2560
- 프로세서 : ATmega2560 (Mega2560)
- 포트 : /dev/ttyUSB0
시리얼 포트를 통해 코드를 올리고 메시지 출력 완료.
Serial 보드레이드 115200 설정 후 loop 문에서 delay(1000) = 1초 간격으로 "TEST1"과 "TEST2"를 출력.
2. 릴레이 디버깅
- 코드
#define RELAY1 6
#define RELAY2 3
#define RELAY3 5
#define RELAY4 4

#define RELAY5 10
#define RELAY6 9
#define RELAY7 8
#define RELAY8 7

#define RELAY9 25
#define RELAY10 26
#define RELAY11 27
#define RELAY12 28

#define RELAY13 29
#define RELAY14 39
#define RELAY15 30
#define RELAY16 31

#define ON LOW
#define OFF HIGH


void setup() {
  // put your setup code here, to run once:
Serial.begin(115200);
Serial.println("START");
pinMode(RELAY1, OUTPUT);
pinMode(RELAY2, OUTPUT);
pinMode(RELAY3, OUTPUT);
pinMode(RELAY4, OUTPUT);

pinMode(RELAY5, OUTPUT);
pinMode(RELAY6, OUTPUT);
pinMode(RELAY7, OUTPUT);
pinMode(RELAY8, OUTPUT);

pinMode(RELAY9, OUTPUT);
pinMode(RELAY10, OUTPUT);
pinMode(RELAY11, OUTPUT);
pinMode(RELAY12, OUTPUT);
pinMode(RELAY13, OUTPUT);
pinMode(RELAY14, OUTPUT);
pinMode(RELAY15, OUTPUT);
pinMode(RELAY16, OUTPUT);

digitalWrite(RELAY1, OFF);
digitalWrite(RELAY2, OFF);
digitalWrite(RELAY3, OFF);
digitalWrite(RELAY4, OFF);
digitalWrite(RELAY5, OFF);
digitalWrite(RELAY6, OFF);
digitalWrite(RELAY7, OFF);
digitalWrite(RELAY8, OFF);
digitalWrite(RELAY9, OFF);
digitalWrite(RELAY10, OFF);
digitalWrite(RELAY11, OFF);
digitalWrite(RELAY12, OFF);
digitalWrite(RELAY13, OFF);
digitalWrite(RELAY14, OFF);
digitalWrite(RELAY15, OFF);
digitalWrite(RELAY16, OFF);

}

void loop() {
 char ch;
 if(Serial.available()){
  ch = Serial.read();
  if(ch == '1'){
    digitalWrite(RELAY1, ON);
  }else if(ch == '2'){
    digitalWrite(RELAY2, ON);
  }else if(ch == '3'){
    digitalWrite(RELAY3, ON);
  }else if(ch == '4'){
    digitalWrite(RELAY4, ON);
  }else if(ch == '5'){
    digitalWrite(RELAY5, ON);
  }else if(ch == '6'){
    digitalWrite(RELAY6, ON);
  }else if(ch == '7'){
    digitalWrite(RELAY7, ON);
  }else if(ch == '8'){
    digitalWrite(RELAY8, ON);
  }else if(ch == '9'){
    digitalWrite(RELAY9, ON);
  }else if(ch == 'a'){
    digitalWrite(RELAY10, ON);
  }else if(ch == 'b'){
    digitalWrite(RELAY11, ON);
  }else if(ch == 'c'){
    digitalWrite(RELAY12, ON);
  }else if(ch == 'd'){
    digitalWrite(RELAY13, ON);
  }else if(ch == 'e'){
    digitalWrite(RELAY14, ON);
  }else if(ch == 'f'){
    digitalWrite(RELAY15, ON);
  }else if(ch == 'g'){
    digitalWrite(RELAY16, ON);
  }else if(ch == 'x'){
    digitalWrite(RELAY1, OFF);
digitalWrite(RELAY2, OFF);
digitalWrite(RELAY3, OFF);
digitalWrite(RELAY4, OFF);
digitalWrite(RELAY5, OFF);
digitalWrite(RELAY6, OFF);
digitalWrite(RELAY7, OFF);
digitalWrite(RELAY8, OFF);
digitalWrite(RELAY9, OFF);
digitalWrite(RELAY10, OFF);
digitalWrite(RELAY11, OFF);
digitalWrite(RELAY12, OFF);
digitalWrite(RELAY13, OFF);
digitalWrite(RELAY14, OFF);
digitalWrite(RELAY15, OFF);
digitalWrite(RELAY16, OFF);
  }
 }

}

모든 릴레이 정상 작동 확인 완료.
- REALY이 제어에 사용될 16개의 디지털 핀을 정의하고 시리얼 통신을 통해 각각의 릴레이를 ON/OFF 테스트.
3. USB 메모리 디버깅
- Serial2
- 라이브러리 : ch376msc.h
- 코드
/*------------------------------------------------------------------------------------------------------------------
      Author: György Kovács                                                                                         |
      Created: 28 Mar 2019                                                                                          |
      Description: Basic usage of CH376 with hardware serial                                                        |
      Thanks for the idea to Scott C , https://arduinobasics.blogspot.com/2015/05/ch376s-usb-readwrite-module.html  |
  ------------------------------------------------------------------------------------------------------------------
*/


#include <Ch376msc.h>

//..............................................................................................................................
// Leave the default jumper settings for the baud rate (9600) on the CH376, the library will set it up the chosen speed(HW serial only)
Ch376msc flashDrive(Serial2, 9600); // Ch376 object with hardware Serial1 on arduino mega baudrate: 9600, 19200, 57600, 115200
//..............................................................................................................................
// buffer for reading
char adatBuffer[255];// max length 255 = 254 char + 1 NULL character
//..............................................................................................................................
// strings for writing to file
char adat[] = "Vivamus nec nisl molestie, blandit diam vel, varius mi. Fusce luctus cursus sapien in vulputate.\n";
char adat2[] = "Lorem ipsum dolor sit amet, consectetur adipiscing elit. Duis efficitur ac est eu pharetra. \n";
//..............................................................................................................................
unsigned long totSect = 0;
unsigned long freeSect = 0;
byte percentg = 0;
byte tmpCommand; //used to store data coming from serial port
boolean readMore;
static char helpString[] = {"h:Print this help\n\n1:Create\n2:Append\n3:Read\n4:Read date/time\n"
                            "5:Modify date/time\n6:Delete\n7:List dir\n8:Print free space"
                            "\n9:Open/Create folder(s)/subfolder(s)"
                           };

void setup() {
  Serial.begin(9600);
  //Serial2.begin(9600);
  Serial.println("USB_START");
  delay(100);
  flashDrive.init();
  printInfo(helpString);
}

void loop() {
  if (flashDrive.checkIntMessage()) {
    if (flashDrive.getDeviceStatus()) {
      Serial.println(F("Flash drive attached!"));
    } else {
      Serial.println(F("Flash drive detached!"));
    }
  }

  if (Serial.available()) {
    tmpCommand = Serial.read();                      //read incoming bytes from the serial monitor
    if (((tmpCommand > 48) && (tmpCommand < 58)) && !flashDrive.driveReady()) { // if the data is ASCII 1 - 9 and no flash drive are attached
      printInfo("Attach flash drive first!");
      Serial.println(tmpCommand);
      //tmpCommand = 10; // change the command byte
    }
    switch (tmpCommand) {
        Serial.println("COMMAND");
      case 49: //1
        printInfo("COMMAND1: Create and write data to file : TEST1.TXT");    // Create a file called TEST1.TXT
        flashDrive.setFileName("TEST1.TXT");  //set the file name
        flashDrive.openFile();                //open the file

        for (int a = 0; a < 20; a++) {        //write text from string(adat) to flash drive 20 times
          flashDrive.writeFile(adat, strlen(adat));//string, string length
        }
        flashDrive.closeFile();               //at the end, close the file
        printInfo("Done!");
        break;
      //*****************************************************************************************************************************************************
      case 50: //2
        printInfo("COMMAND2: Append data to file: TEST1.TXT");               // Append data to the end of the file.
        flashDrive.setFileName("TEST1.TXT");  //set the file name
        if (flashDrive.openFile() == ANSW_USB_INT_SUCCESS) {             //open the file
          flashDrive.moveCursor(CURSOREND);     //if the file exist, move the "virtual" cursor at end of the file, with CURSORBEGIN we actually rewrite our old file
          //flashDrive.moveCursor(flashDrive.getFileSize()); // is almost the same as CURSOREND, because we put our cursor at end of the file
        }
        for (int a = 0; a < 20; a++) {        //write text from string(adat) to flash drive 20 times
          if (flashDrive.getFreeSectors()) { //check the free space on the drive
            flashDrive.writeFile(adat2, strlen(adat2)); //string, string length
          } else {
            printInfo("Disk full");
          }
        }
        flashDrive.closeFile();               //at the end, close the file
        printInfo("Done!");
        break;
      //*****************************************************************************************************************************************************
      case 51: //3
        printInfo("COMMAND3: Read File: TEST1.TXT");                         // Read the contents of this file on the USB disk, and display contents in the Serial Monitor
        flashDrive.setFileName("TEST1.TXT");  //set the file name
        flashDrive.openFile();                //open the file
        readMore = true;
        //read data from flash drive until we reach EOF
        while (readMore) { // our temporary buffer where we read data from flash drive and the size of that buffer
          readMore = flashDrive.readFile(adatBuffer, sizeof(adatBuffer));
          Serial.print(adatBuffer);          //print the contents of the temporary buffer
        }
        flashDrive.closeFile();               //at the end, close the file
        printInfo("Done!");
        break;
      //*****************************************************************************************************************************************************
      case 52: //4
        printInfo("COMMAND4: Read File date/time: TEST1.TXT");      // Read the date and time of file, default 2004.01.01 - 00:00:00
        flashDrive.setFileName("TEST1.TXT");            //set the file name
        flashDrive.openFile();                          //open the file
        //print informations about the file
        Serial.println(flashDrive.getFileName());
        Serial.print(flashDrive.getYear());
        Serial.print("y\t");
        Serial.print(flashDrive.getMonth());
        Serial.print("m\t");
        Serial.print(flashDrive.getDay());
        Serial.print("d\t");
        Serial.print(flashDrive.getHour());
        Serial.print("h\t");
        Serial.print(flashDrive.getMinute());
        Serial.print("m\t");
        Serial.print(flashDrive.getSecond());
        Serial.println('s');
        flashDrive.closeFile();                         //at the end, close the file
        printInfo("Done!");
        break;
      //*****************************************************************************************************************************************************
      case 53: //5
        printInfo("COMMAND5: Modify File date/time: TEST1.TXT");    // Modify the file date/time and save
        flashDrive.setFileName("TEST1.TXT");  //set the file name
        flashDrive.openFile();                //open the file

        flashDrive.setYear(2019);
        flashDrive.setMonth(12);
        flashDrive.setDay(19);
        flashDrive.setHour(03);
        flashDrive.setMinute(38);
        flashDrive.setSecond(42);

        flashDrive.saveFileAttrb();           //save the changed data
        flashDrive.closeFile();               //and yes again, close the file after when you don`t use it
        printInfo("Done!");
        break;
      //*****************************************************************************************************************************************************
      case 54: //6
        printInfo("COMMAND6: Delete File: TEST1.TXT");                       // Delete the file named TEST1.TXT
        flashDrive.setFileName("TEST1.TXT");  //set the file name
        flashDrive.deleteFile();              //delete file
        printInfo("Done!");
        break;
      //*****************************************************************************************************************************************************
      case 55: //7
        printInfo("COMMAND7: List directory");                          //Print all file names in the current directory
        while (flashDrive.listDir()) { // reading next file
          if (flashDrive.getFileAttrb() == CH376_ATTR_DIRECTORY) { //directory
            Serial.print('/');
            Serial.println(flashDrive.getFileName()); // get the actual file name
          } else {
            Serial.print(flashDrive.getFileName()); // get the actual file name
            Serial.print(" : ");
            Serial.print(flashDrive.getFileSize()); // get the actual file size in bytes
            Serial.print(" >>>\t");
            Serial.println(flashDrive.getFileSizeStr()); // get the actual file size in formatted string
          }
        }
        printInfo("Done!");
        break;
      //*****************************************************************************************************************************************************
      case 56: //8
        totSect = flashDrive.getTotalSectors(); // get the total sector number
        freeSect = flashDrive.getFreeSectors(); // get the available sector number
        percentg = map(freeSect, totSect, 0, 0, 100); 		// convert it to percentage (0-100)
        Serial.print("Disk size in bytes: ");
        /*if the sector number is more than 8388607 (8388607 * 512 = 4294966784 byte = 4Gb (fits in a 32bit variable) )
          							 e.g. 8388608 * 512 = 4294967296 byte (32bit variable overflows) */
        if (totSect > 8388607) {
          Serial.print(">4Gb");
        } else {
          Serial.print(totSect * SECTORSIZE);
        }
        Serial.print("\tFree space in bytes: ");
        if (freeSect > 8388607) {
          Serial.print(">4Gb");
        } else {
          Serial.print(freeSect * SECTORSIZE);
        }
        Serial.print(F("\tDisk usage :"));
        Serial.print(percentg);
        Serial.print(F("%"));
        switch (flashDrive.getFileSystem()) { //1-FAT12, 2-FAT16, 3-FAT32
          case 1:
            Serial.println(F("\tFAT12 partition"));
            break;
          case 2:
            Serial.println(F("\tFAT16 partition"));
            break;
          case 3:
            Serial.println(F("\tFAT32 partition"));
            break;
          default:
            Serial.println(F("\tNo valid partition"));
            break;
        }
        break;
      //*****************************************************************************************************************************************************
      case 57: //9
        switch (flashDrive.cd("/DIR1/DIR2/DIR3", 1)) {
          case CH376_ERR_LONGFILENAME: //0x01
            Serial.println(F("Directory name is too long"));
            break;

          case ANSW_USB_INT_SUCCESS: //0x14
            Serial.println(F("Directory created successfully"));
            break;

          case ANSW_ERR_OPEN_DIR: //0x41
            Serial.println(F("Directory opened successfully"));
            break;

          case ANSW_ERR_MISS_FILE: //0x42
            Serial.println(F("Directory doesn't exist"));
            break;

          case ANSW_ERR_FOUND_NAME: //0x43
            Serial.println(F("File exist with the given name"));
            break;

          default:

            break;
        }
        break;
      //*****************************************************************************************************************************************************
      case 104: //h
        printInfo(helpString);
        break;
      default:
        break;
    }//end switch

  }//endif serial available

}//end loop

//Print information
void printInfo(const char info[]) {

  int infoLength = strlen(info);
  if (infoLength > 40) {
    infoLength = 40;
  }
  Serial.print(F("\n\n"));
  for (int a = 0; a < infoLength; a++) {
    Serial.print('*');
  }
  Serial.println();
  Serial.println(info);
  for (int a = 0; a < infoLength; a++) {
    Serial.print('*');
  }
  Serial.print(F("\n\n"));
}
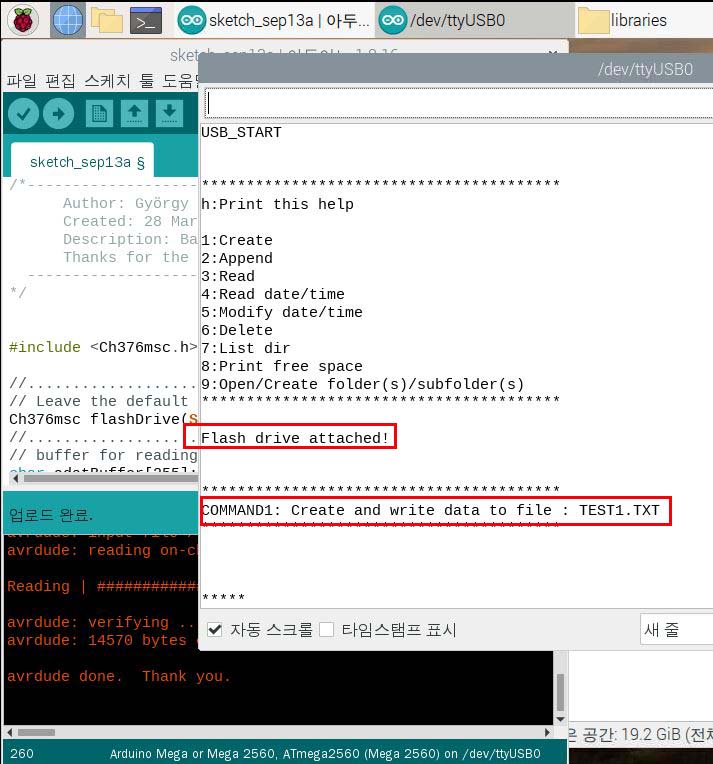
- USB 저장장치를 연결하고 Serial2를 통해 데이터 저장과 출력.
- 시리얼 통신을 통해 입력되는 숫자에 따라 파일을 생성하고 데이터를 기록하며 출력하는 과정으로 디버깅.

4. WiFi 디버깅
- Serial3 (로라와 공통 사용 : 스위치)
- 라이브러리 : WiFiEsp.h
- 코드
/*
 WiFiEsp example: WebClient

 This sketch connects to google website using an ESP8266 module to
 perform a simple web search.

 For more details see: http://yaab-arduino.blogspot.com/p/wifiesp-example-client.html
*/

#include "WiFiEsp.h"

// Emulate Serial1 on pins 6/7 if not present
#ifndef HAVE_HWSERIAL1
#include "SoftwareSerial.h"
SoftwareSerial Serial1(6, 7); // RX, TX
#endif

char ssid[] = "Twim";            // your network SSID (name)
char pass[] = "12345678";        // your network password
int status = WL_IDLE_STATUS;     // the Wifi radio's status

char server[] = "arduino.cc";

// Initialize the Ethernet client object
WiFiEspClient client;

void setup()
{
  // initialize serial for debugging
  Serial.begin(115200);
  // initialize serial for ESP module
  Serial1.begin(9600);
  // initialize ESP module
  WiFi.init(&Serial1);

  // check for the presence of the shield
  if (WiFi.status() == WL_NO_SHIELD) {
    Serial.println("WiFi shield not present");
    // don't continue
    while (true);
  }

  // attempt to connect to WiFi network
  while ( status != WL_CONNECTED) {
    Serial.print("Attempting to connect to WPA SSID: ");
    Serial.println(ssid);
    // Connect to WPA/WPA2 network
    status = WiFi.begin(ssid, pass);
  }

  // you're connected now, so print out the data
  Serial.println("You're connected to the network");

  printWifiStatus();

  Serial.println();
  Serial.println("Starting connection to server...");
  // if you get a connection, report back via serial
  if (client.connect(server, 80)) {
    Serial.println("Connected to server");
    // Make a HTTP request
    client.println("GET /asciilogo.txt HTTP/1.1");
    client.println("Host: arduino.cc");
    client.println("Connection: close");
    client.println();
  }
}

void loop()
{
  // if there are incoming bytes available
  // from the server, read them and print them
  while (client.available()) {
    char c = client.read();
    Serial.write(c);
  }

  // if the server's disconnected, stop the client
  if (!client.connected()) {
    Serial.println();
    Serial.println("Disconnecting from server...");
    client.stop();

    // do nothing forevermore
    while (true);
  }
}


void printWifiStatus()
{
  // print the SSID of the network you're attached to
  Serial.print("SSID: ");
  Serial.println(WiFi.SSID());

  // print your WiFi shield's IP address
  IPAddress ip = WiFi.localIP();
  Serial.print("IP Address: ");
  Serial.println(ip);

  // print the received signal strength
  long rssi = WiFi.RSSI();
  Serial.print("Signal strength (RSSI):");
  Serial.print(rssi);
  Serial.println(" dBm");
}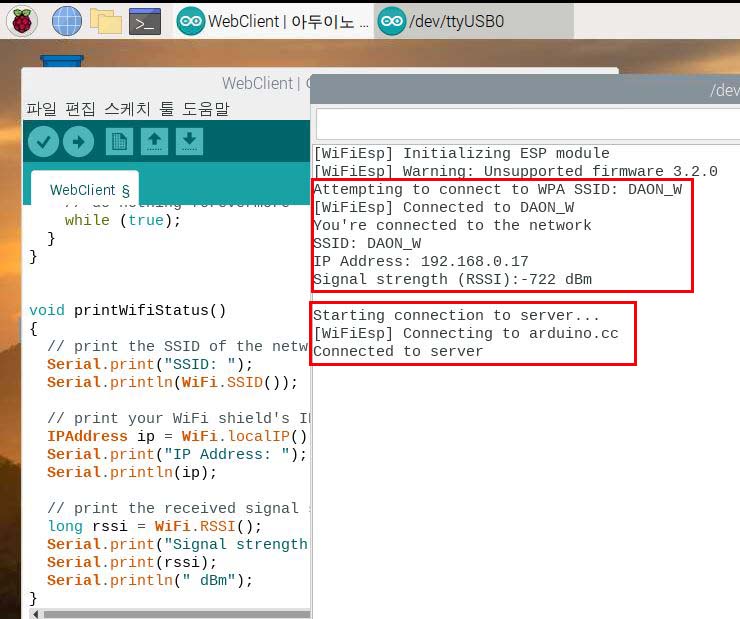
- WIFI 모듈의 Connetcion 테스트 진행.
- SSID와 PASSWD를 지정한 후 해당 와이파이와 연결하고 IP 할당 및 신호세기 및 서버 연결 상태 확인.
5. LoRa 디버깅
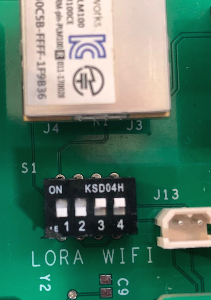
- Serial3 (WiFi와 공통 사용 : 스위치)
- 라이브러리 : WiFiEsp.h
- 코드
void setup() {
  Serial3.begin(115200);
  Serial.begin(115200);
  Serial.println("START");

}

void data_read() {
  char ch;
  while (Serial3.available()) {
    ch = Serial3.read();
    Serial.print(ch);
  }
}
void loop() {

  if (Serial.available()) {
    Serial3.write(Serial.read());
  }

  if (Serial3.available()) {
    data_read();
  }
}
- PLM100 LoRa 모듈의 현재 설정값들을 보여주는 at+show 명령어를 통해 모듈을 상태를 확인.